In today's increasingly digital world, contact management is evolving rapidly. Traditional business cards are being replaced by their digital counterparts, and ClickCard is at the forefront of this change.
Now you can take the networking experience to the next level by adding your digital business cards directly to Apple Wallet.
In this guide, we'll show you how to do that in a few simple steps.
Step 1: Download the ClickCard App
Welcome to a new world of simplified digital networking! With ClickCard and Apple Wallet, you can take your contact sharing experience to the next level.
In the first step of this guide, we are going to explore how to download and start your journey with the ClickCard app.
The first step to enjoying the convenience of digital business cards and Apple Wallet is to download the ClickCard app on your mobile device.
Follow this simple process to start your journey:
Go to the App Store or Play Store
Open the App store or Play Store on your device. You can find the store icon on your home screen or using the search bar. Tap on it to get started.
Open the ClickCard App
After installation, tap the ClickCard application icon on your home screen to open it. Now you're ready to start creating and sharing your digital business cards in an innovative way.
Step 2: Create Your Digital Business Card
The evolution of business cards has arrived!
In the second step of this guide, we will explore how to create your own digital business card with ClickCard, preparing yourself for a new era of digital networking.
The second step towards optimizing your network of contacts is to create your unique digital business card using the ClickCard platform.
Follow these simple steps to start customizing your digital presence:
Open the ClickCard App
Make sure the ClickCard app is installed on your mobile device and launch it by tapping the icon.
If you've followed the first step in our guide, you're ready to dive into creating your digital card.
Choose a Template or Start from Scratch
ClickCard offers a variety of digital business card templates to choose from. Select a template that best reflects your professional identity, or choose to start from scratch contacting the platform's creative team.
Enter Your Contact Information
Enter your contact information, including name, title, company, email address and links to your social networks. Make sure all information is correct as it will be shared with your contacts.
Customize the Design
Bring your digital business card to life with touches of personality. Choose color schemes, fonts and visuals that represent you or your brand.
An attractive appearance will make your card stand out.
Add a Photo
You can add a photo of yourself to the card or logo. This adds a personal touch and helps people remember you more easily.
Review and Adjust
Before finalizing, review all the information and design of your digital business card. Make sure it looks exactly how you want others to see it.
Save and Share
After adjusting everything according to your preference, click "Save" or "Finish" to finish the creation process. Now you have a digital business card that is unique and ready to be shared .

Step 3: Access Your Card's QR Code
The digital business card revolution continues!
In the third step of this guide, we'll explore how to generate your ClickCard digital card's unique QR code, allowing you to share your information with a simple tap.
Now that you've created a stunning digital business card, it's time to turn it into a QR code easy to share.
Follow the steps below to generate your personalized QR code:
Access Your Digital Card
Launch the ClickCard app on your mobile device and access the digital business card you created on the app's home page.
Make sure all information is correct and up to date.
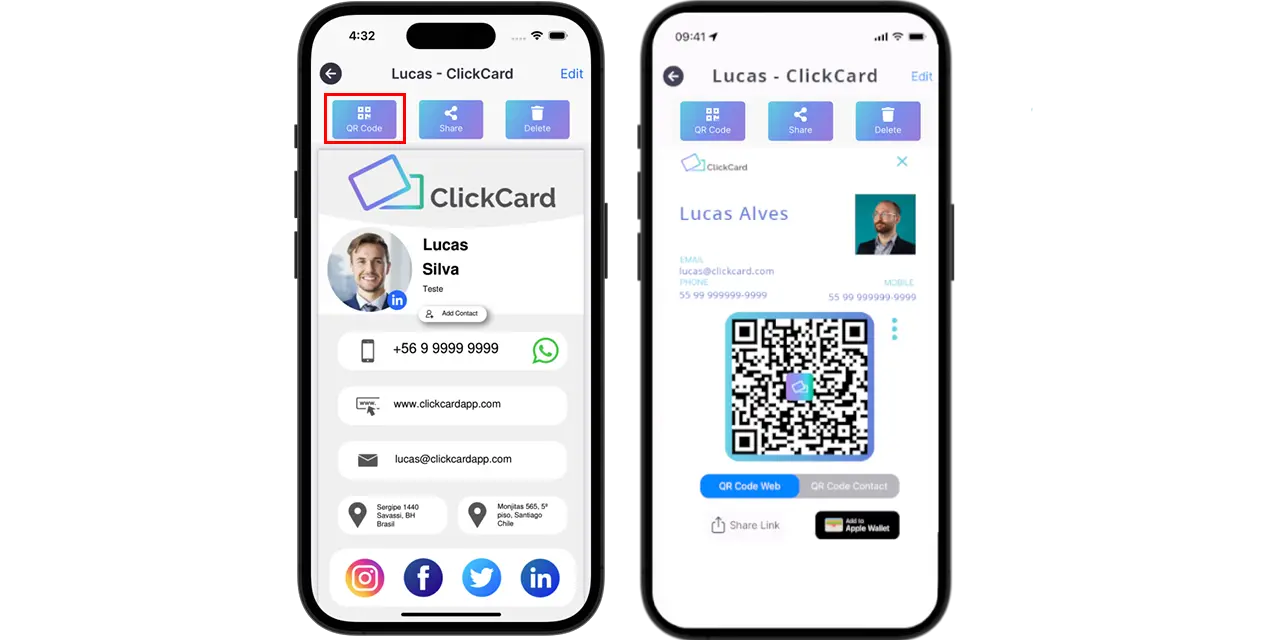
Access the “QR Code” button
Within the view of your digital card, look for an option that allows you to see the “QR Code” button. Generally, this option will be associated with sharing or exporting your card, at the top of the screen.
Click on it.
View
After opening the QR code, you will see a preview of it on the screen. Make sure all information displayed on the QR code matches the information on your card.
Save the QR Code
You will then have the option to save and share the QR Code on your device. This will allow you to easily share it with others when needed.
Sharing Your QR Code
Now that you have the QR Code for your digital business card, you can share it with contacts quickly and intuitively.
All they need to do is scan the code with their smartphone camera to access your information.
Step 4: Open Apple Wallet
The contact management revolution is in full swing!
In step four of this guide, we'll explore how to open Apple Wallet, the gateway to turning your ClickCard digital business card into an intuitive networking tool.
The time has come to bring your digital business card to life through Apple Wallet.
Follow the steps below to access this powerful tool and prepare to simplify your network:
ClickCard QR Code Screen
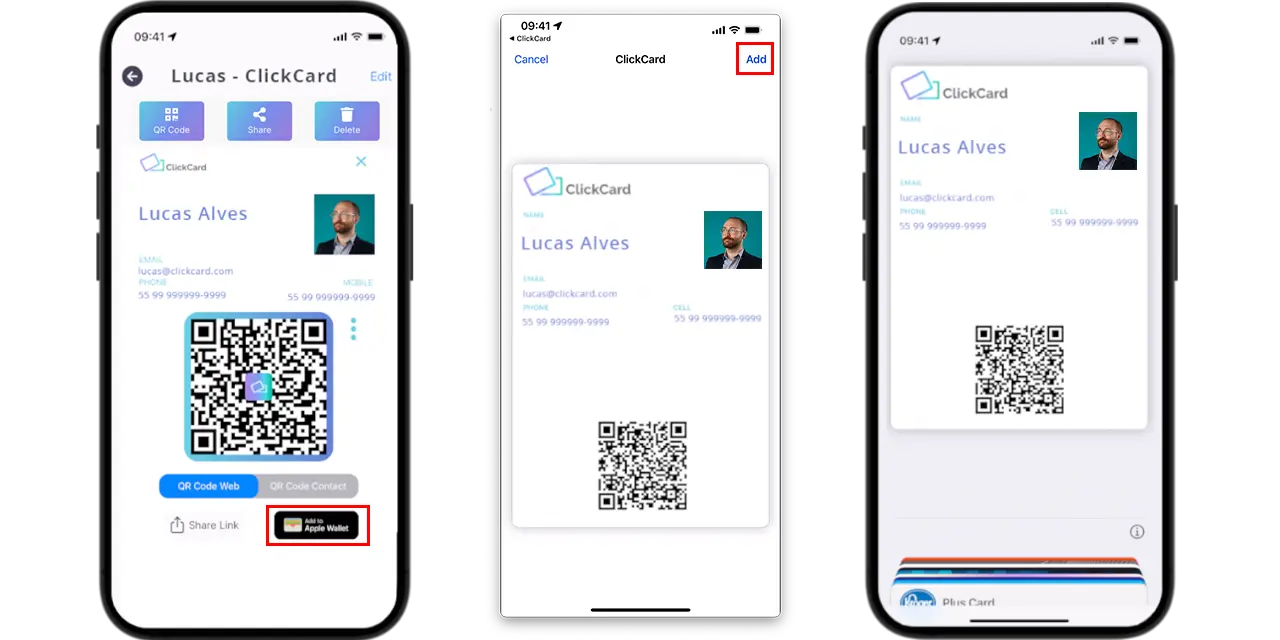
Still on the ClickCard QR Code screen, you must look for the “Add to Apple Wallet” button located below the QR Code.
Click on the button.
It will direct you to the wallet and present you with a thumbnail of your QR Code.
To add it to your Apple Wallet, just click on “add” at the top of the screen.
Done!
Now when you open your Apple Wallet, the QR Code of your digital business card will be there!
Share your card with ease with ClickCard!

Step 5: Add the Card to Apple Wallet
We are almost there!
In the fifth step of this guide, we will explore how to add the digital business card generated by ClickCard to your Apple Wallet.
Get ready to make your professional connections more effective and dynamic than ever.
Step five is the crucial moment where you transform the QR Code on your digital business card into an accessible and practical tool within Apple Wallet.
Follow the steps below to complete adding your card:
Scan the QR Code
Point your Apple device's camera at the QR Code generated by ClickCard. The camera will automatically recognize the code and offer the option to add the card to your Apple Wallet.
Tap to Add
When Apple Wallet identifies the QR code, you will receive a notification or instruction to add the card. Tap the option to continue the process.
Confirm the Information
Apple Wallet will display the information contained in the ClickCard digital business card. Check that all details are correct and match your contact information.
Tap "Add"
After verifying the information, tap the "Add" button or equivalent. The ClickCard digital business card will be added to your Apple Wallet.
Access Your Card in Apple Wallet
Successfully! You can now access your ClickCard digital business card directly from Apple Wallet. Just open the app and look for your new scanned card.
Step 6: Enjoy the Advantages
You have reached the final stage of transforming your professional connections!
In the sixth and final step of this guide, we'll explore how to make the most of the benefits of your ClickCard digital business card stored in Apple Wallet.
The sixth step is the culmination of the journey, where you put your digital connections into action and enjoy the benefits of practicality.
Follow the steps below to make the most of your digital card in Apple Wallet:
Always have your card on hand
Now that you've added your ClickCard digital business card to Apple Wallet, it will always be available on your device. No matter where you are, your contact information is just a tap away.
Share Easily with a Tap
When you come across a contact who wants to share their information, simply open Apple Wallet, select your ClickCard card, and ask the recipient to scan the QR Code. Sharing has become as simple as that.
Keep your information up to date
If your contact information changes, simply update your ClickCard in the corresponding app.
The version in Apple Wallet will be updated automatically, preventing the spread of outdated information.
Boost your Professional Interactions
The convenience of your ClickCard digital business card in Apple Wallet allows you to focus on conversations and interactions rather than manually searching for and exchanging information. This helps create a smoother, more professional experience.
Reduce Paper Waste
By adopting digital business cards, you contribute to reducing paper waste, making your interactions more ecological and aligned with sustainable practices.
Conclusion
The addition of ClickCard digital business cards to Apple Wallet is an important step in simplifying digital networking. With a few simple steps, you can conveniently create, share, and keep your contact information up to date.
Say goodbye to reams of physical business cards and welcome a smarter, more effective way to connect with the people around you.
"Using ClickCard has transformed the way I network. I can share my information effortlessly, and it is always update and with me on the go."

Download our App
Discover how ClickCard can elevate your professional connections and streamline your networking efforts today!

FAQs
Find answers to your questions about ClickCard and digital business cards below.
ClickCard is a digital business card platform that replaces traditional paper cards. It allows users to create customizable digital business cards that can be shared instantly. This innovative solution enhances networking while being environmentally friendly.
Users can create their digital cards using the ClickCard app. These cards can be shared via NFC, QR codes, links or media. This makes networking seamless and efficient.
Yes, ClickCard offers extensive customization options. Users can add their information, backgrounds, social media links, and branding elements. This ensures that your card reflects your personal or company identity.
ClickCard offers sophisticated analytics to monitor and optimize your card interactions. Users can track how often their card is viewed or saved and even see detailed click counts for each button on their digital business card. Managers can analyze both individual and company-wide performance, tracking key metrics such as QR code scans and NFC taps. They can also see which call-to-actions—phone number, email, contact addition, social media, and more—are most engaging, along with the overall number of leads generated. This comprehensive data empowers businesses to fine-tune their networking and marketing strategies.
Absolutely! ClickCard eliminates the need for paper business cards. By going digital, users contribute to a more sustainable future.
Still have questions?
We're here to help you with any inquiries.


