ClickCard, a company dedicated to professional networking, offers a powerful tool in its application: the Digital Business Card Creator. In this feature, users have access to free and paid custom templates.
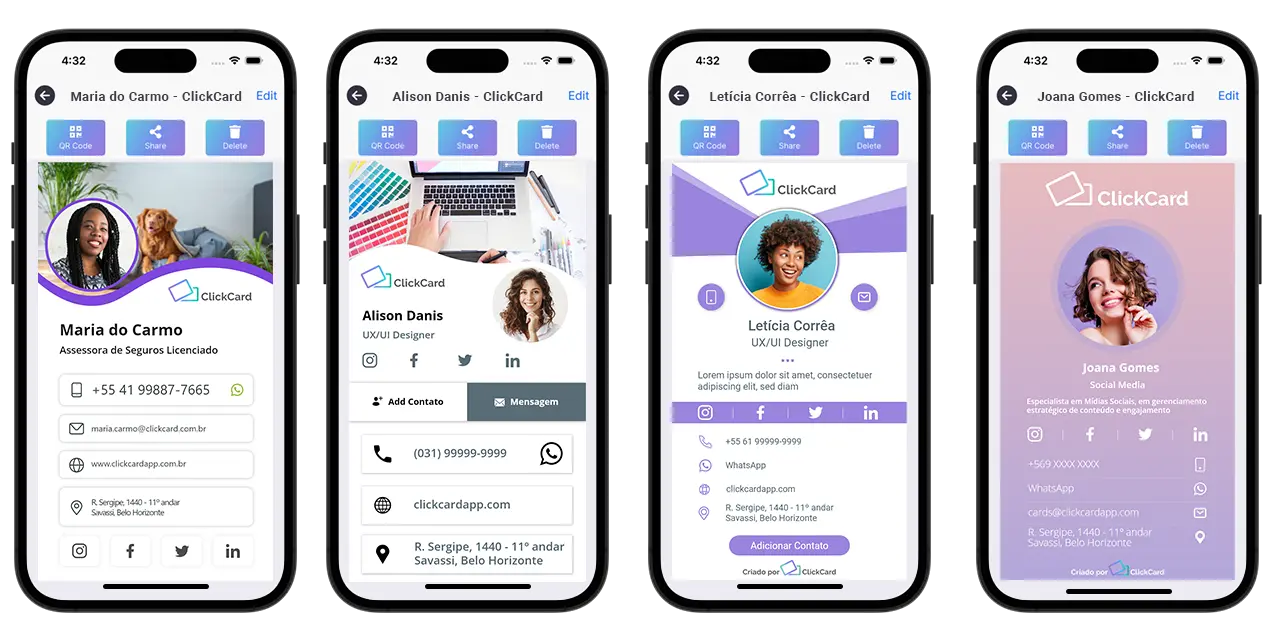
Below we present some of our available free digital business cards . If you want to purchase one of them, just download the ClickCard App and customize your own card!
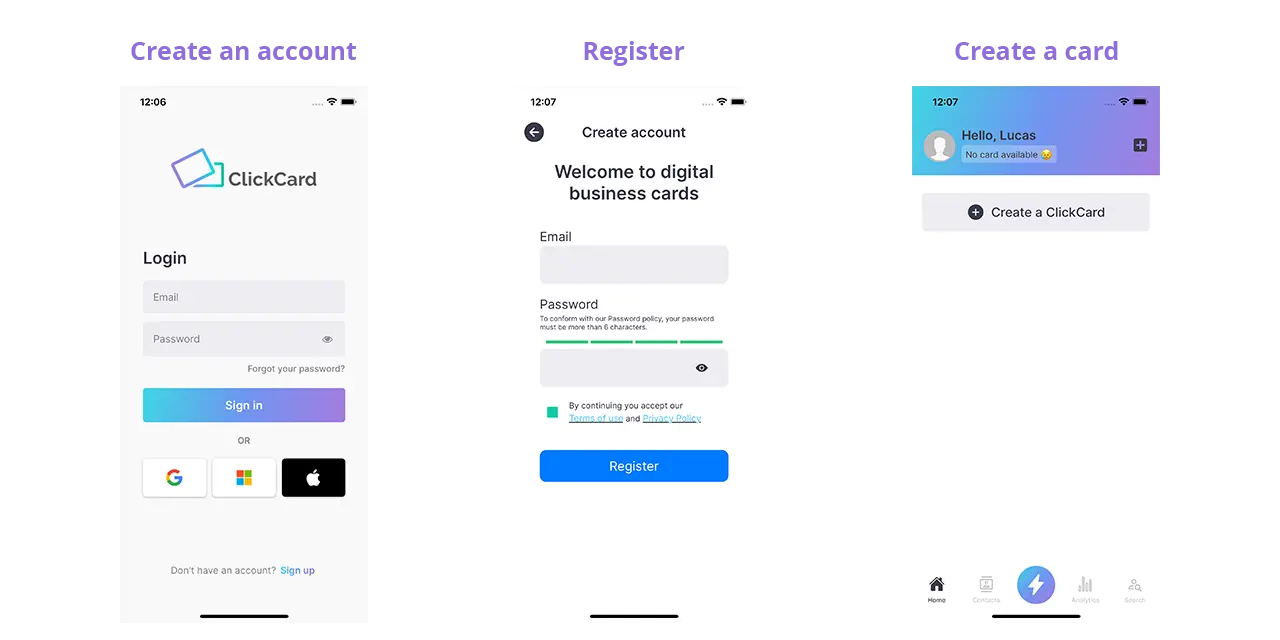
But, before you start using Creator, you need to follow some steps, such as: creating your account.
ClickCard's goal is to simplify the contact sharing process. To achieve this, we developed an application that allows users to create their own digital business cards . Our platform offers varied models for testing in order to meet different needs.
Thinking about making this tool available to everyone, ClickCard offers free templates in its app , which can be easily customized by the user . Free digital card templates allow the integration of contact data, such as email, telephone, social networks and address. Additionally, you can edit photos, backgrounds and other graphic elements unique to each template.
You may be wondering: "How do I create a digital business card in the ClickCard app?" Keep reading the blogpost, because I will teach you!
Essential Step: Download the ClickCard App ( App Store and Play Store ).
After installation, the user will be able to create their account on the application , providing an email and password for login. This information will then be sent to the registered email in order to confirm the account registration .
After confirming the email , the user will be able to personalize their profile , providing their name, age, position, photo and company . This information can be filled in later or at the time of registration, allowing the user to skip this step, if desired.
Upon completing registration, the user will have access to Various tools available in the application . They are: metrics, proximity search, sharing and, of course, the creation of digital business cards .
In this blog we will teach you how to use Creator, a free and interactive tool from ClickCard to create your own digital business card .
Creating a free digital business card: Step by Step in the ClickCard App
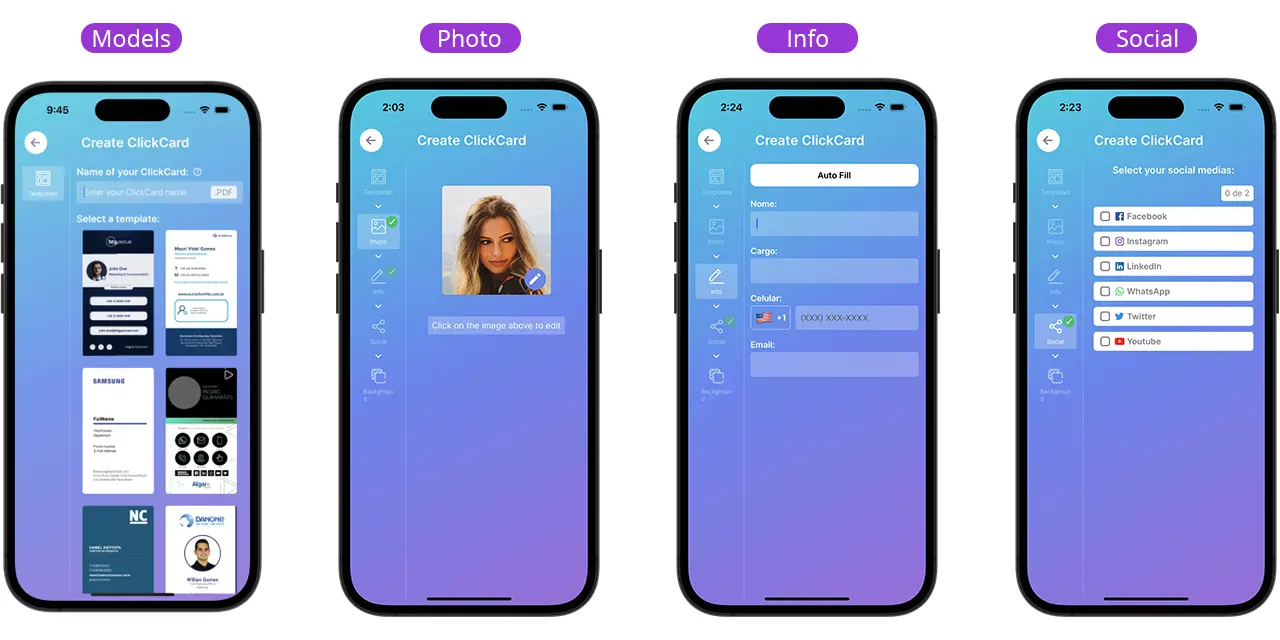
Creating a digital business card in the ClickCard app is summarized in 5 steps. Are they:
- Templates : where the user chooses the card template they want to use;
- Photo : place where the user can upload a profile image of themselves or their company;
- Info : space in which the persona fills in their contact information, such as email, name, title, website;
- Social : field in which professionals choose and insert their social networks;
- Design : stage in which the user can edit the graphic elements of the chosen template, such as background, icon colors and images.
After these steps, the user will already have their digital business card available for viewing, editing or sharing.
But, for a better understanding, we will talk about the Creator in stages.
Continue reading to learn about the unique features of each one.
1st Step: choose personalized digital business card templates in the ClickCard App
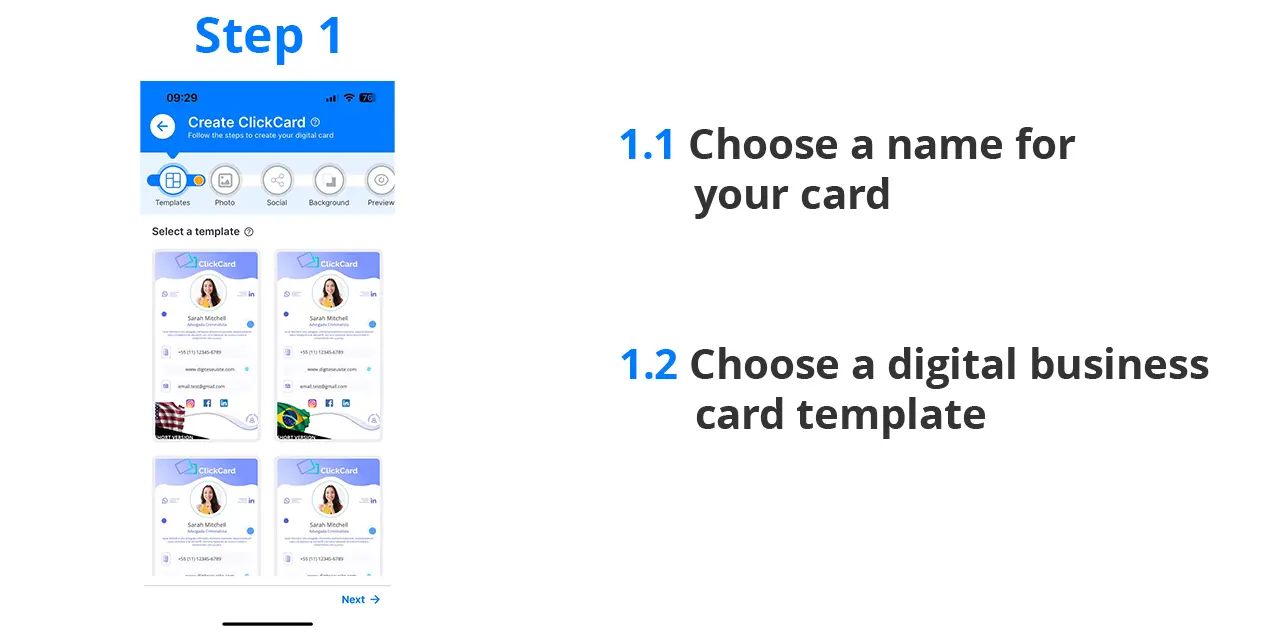
When you access ClickCard Creator, you will have access to a wide variety of pre-formatted templates. Customize the one you prefer according to your profile.
In this step, you will find several free templates , each carefully designed with specific information.
Each template offers a unique combination of colors, icons, typography, and other graphic elements. So that you can have a personalized card that suits your brand, simply choose the template accordingly and edit it accordingly.
The idea is to provide you with the opportunity to have an exclusive digital business card, even in the free version.
When choosing the template , select and assign a name to it to continue creating your card .
It is worth mentioning that the name you give to your digital business card will be used for internal searches in the application. Additionally, it will be the title of the file when shared, both internally and externally.
2nd Step: add photo and logo to the digital business card
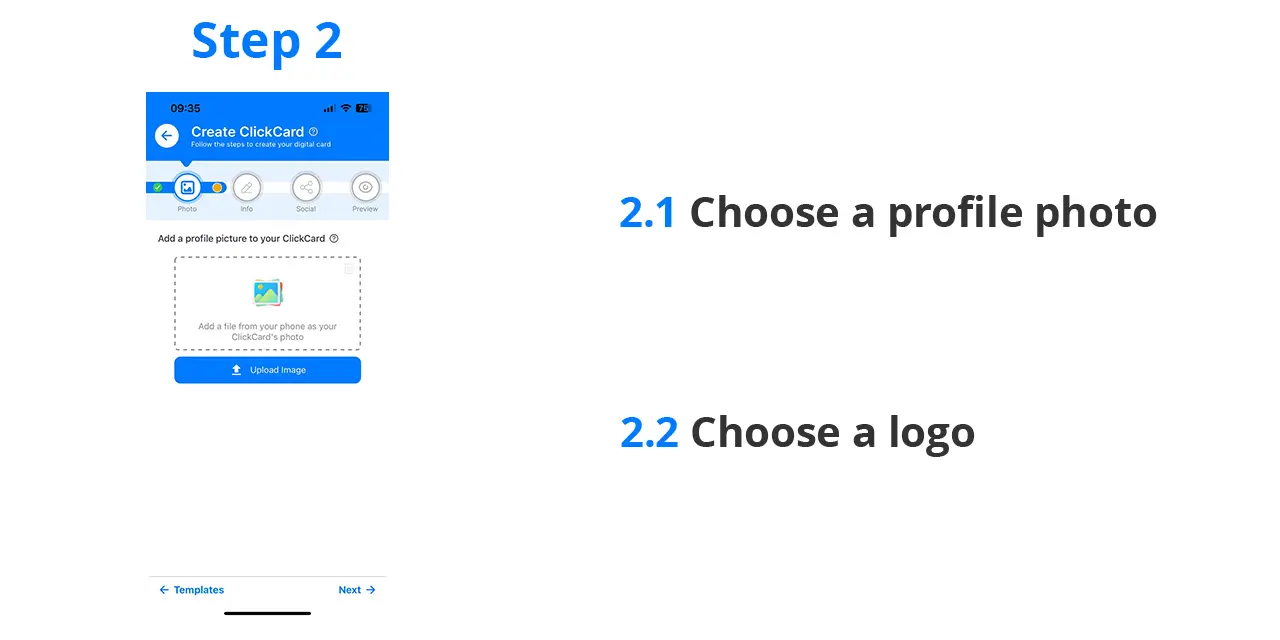
After choosing a digital business card template, naming it and selecting it, the next step is the photo step . At this point, you have the option to upload an image of yourself or your company logo .
To upload the photo, it is important to allow the app access to your phone's media . This way, you can select an image directly from your device's gallery or search for the logo in the application's search field.
The field intended for the image has an aspect ratio of 1080x1080 pixels. It allows you to make necessary cuts or rotations to adapt it to the available space on the digital business card. This way, you can ensure that the photo is perfectly aligned and highlighted.
Adding a photo to your digital business card provides a personal and professional touch, allowing people to identify you visually . Don't miss the opportunity to convey an impactful image through this essential step.
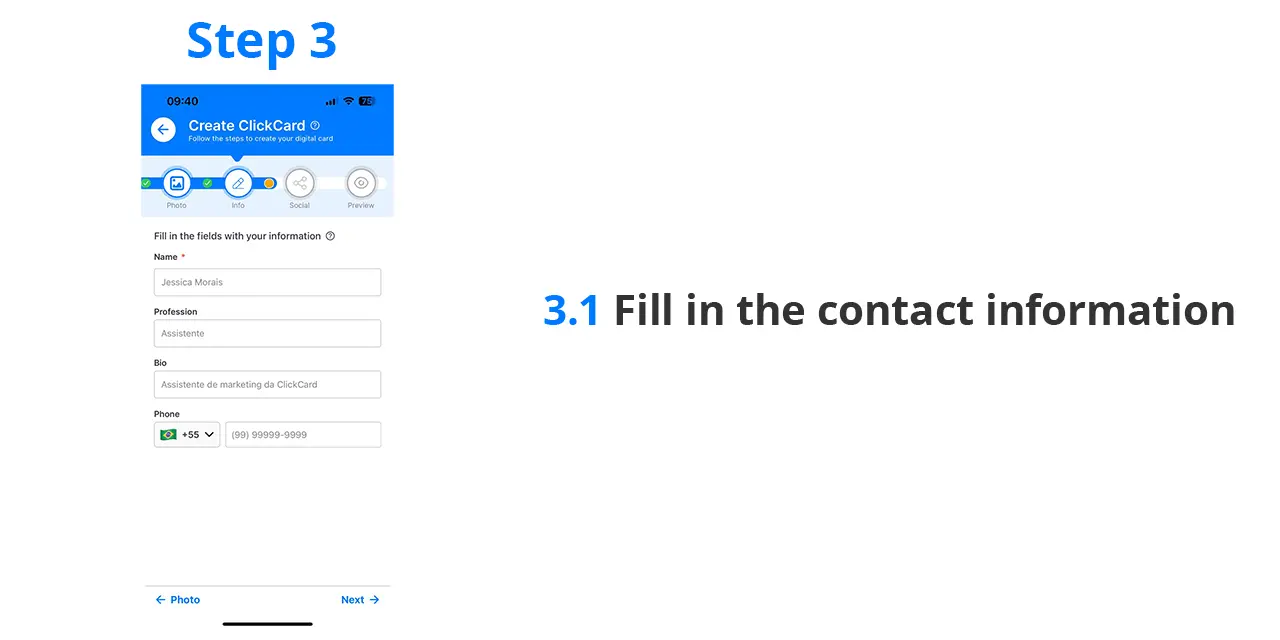
3rd Step: Filling in Contact Information
After uploading your selected image, it's time for the contact information you want to include on your digital business card .
In this step, you can add your name, title, mobile number, email address and website .
There are two ways to complete this filling:
The first is to manually enter your information in each corresponding field , accessing each one individually.
The second option is to select the "Autofill" option. It allows fields to be filled automatically based on the data added to your registration .
The information added in this section is the contact information that will be visible on your digital card .
They are essential so that people can contact you easily and directly when accessing your card.
Be sure to provide accurate and up-to-date information. These details will be the main form of contact for those accessing your digital card.
Ensure that your contacts can easily find you and start productive conversations based on the information you provide.
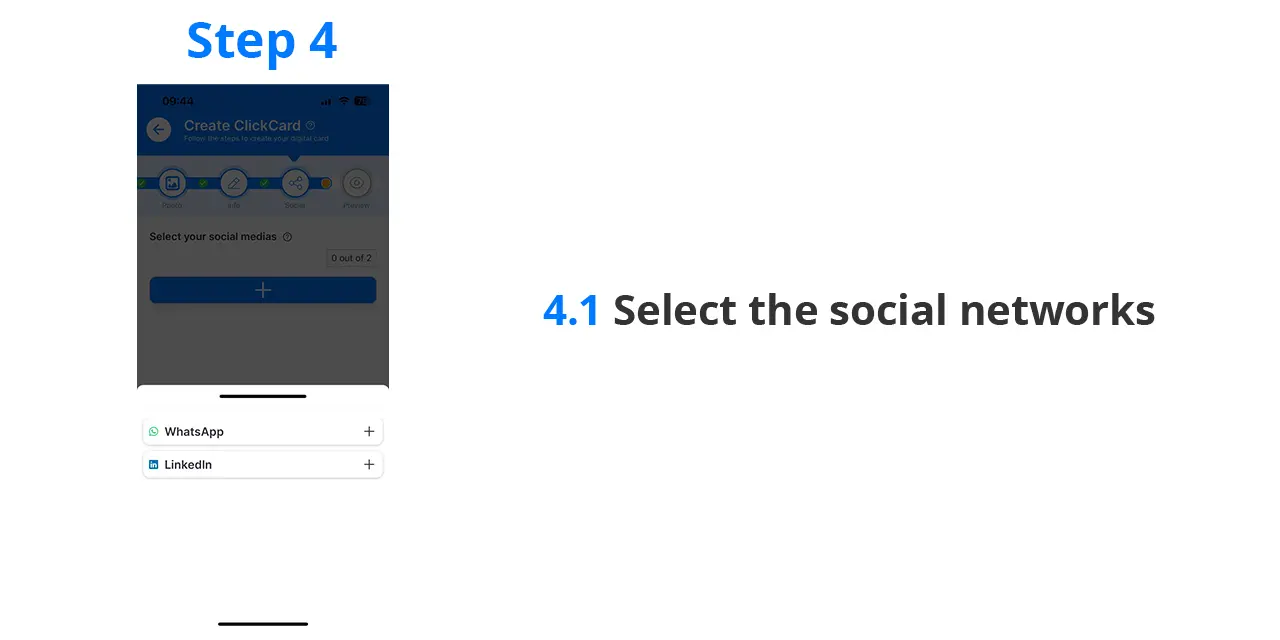
4th Step: adding Social Networks
In this step, you will have the opportunity to select the social networks you want to display on your digital business card. We have six popular options available: Facebook, LinkedIn, WhatsApp, Instagram, Twitter and Youtube.
To correctly fill in the information, simply insert your profile link on the desired social networks in the corresponding fields.
Make sure your links are correct to ensure people can find and connect with you on their preferred platforms.
It is important to highlight that to share the LinkedIn profile link , you need to follow some additional steps:
1. Access your profile in the LinkedIn app and click on the "three dots" next to the "Add section" button.
2. Then you will be shown a sharing option called "Share profile via URL". Select this option and copy the generated link text.
This will be the link you add to the LinkedIn field when selecting it as a social network for your card.
Take advantage of this step to give your contacts direct access to your social networks. This allows them to connect and track their work, projects and updates across various online platforms.
Step 5: Background
In step 5 of the Creator, the user can add a background to their digital business card.
It can do this in three ways: selecting an image from our database, uploading an image from your device to the app or selecting a solid color that you like.
View:
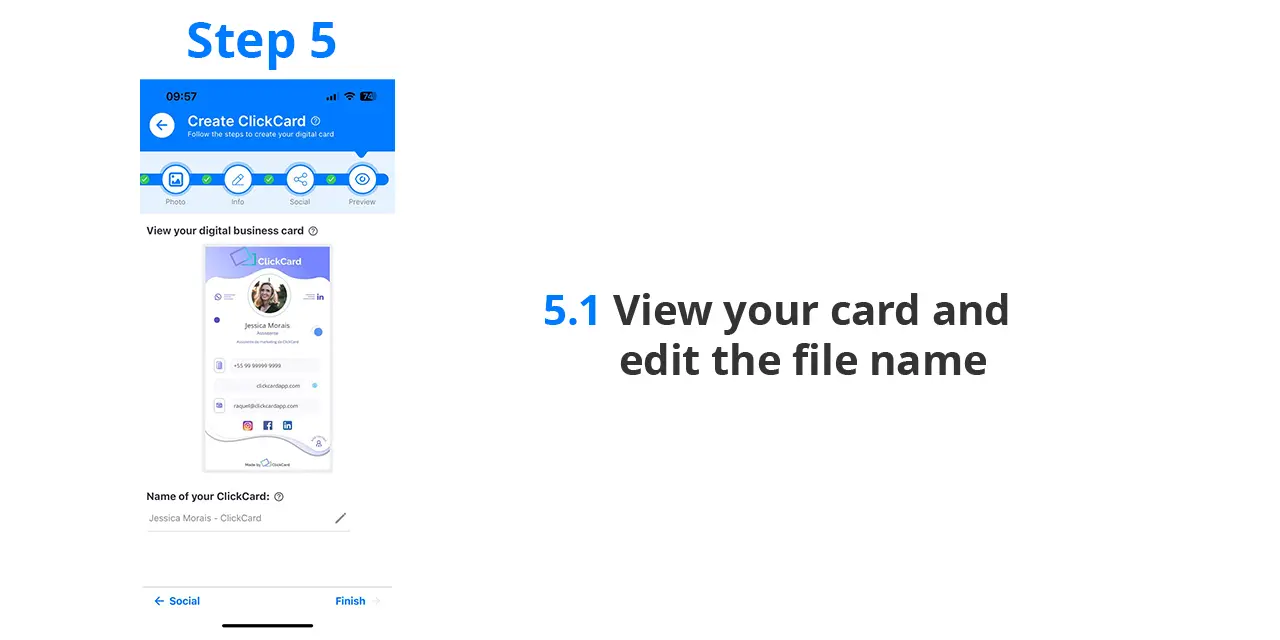
Final Step: Card Preview
In this step you will be able to view your digital business card by choosing it, in addition to editing the file name (which it will be when you share it) and its link.
If you have something you want to modify, just click on the icon for the desired step.
Difference between Premium User and Free User at ClickCard
When using the ClickCard app, you will find two account options: premium user and free user . But after all, what is the difference between these two modalities?
Keep reading to find out all the details.
When it comes to creating a digital business card, people want something that reflects their visual identity and represents them appropriately.
The business card is a crucial tool for making a good first impression . This is why professionals convey their vision, values and objectives from the first contact. This involves statements, clothing, products, companies and even the way in which networking is done.
ClickCard understands the importance of integrating visual identity into its customers' digital business cards. Therefore, details such as typography, color palette, logo, graphic elements and other visual aspects of the company can be incorporated into the card .
Now, you're probably wondering what the difference is between user accounts . Here is the information you need to know:
Premium User: No Limitations
By becoming a premium user, you will not have any limitations when creating your digital business card. You will be able to edit and customize the icons to your liking, insert exclusive vector designs and add light and shadow effects as you wish .
As a premium user, you will have complete freedom to create your card by adding the design and information you deem necessary.
Metrics Tool: analyze your card engagement
As a premium user, you will have access to additional features in the ClickCard app.
In addition to the Card Creator, we offer the Metrics tool , which provides insights into your digital card engagement .
With this tool, you can track how many times your card has been accessed daily, weekly or monthly.
It offers valuable insights into events, networking, and what contact information users have accessed.
Digital Wallet: Organize your Contacts Efficiently
Another exclusive tool for premium users is the Digital Wallet.
When you save a new contact in the ClickCard app, it will go to your digital wallet .
In your digital wallet, you will be able to access all your saved contacts. This includes corporate, scanned contacts as well as those obtained through custom searches.
The application allows you to organize your contacts automatically, according to the way the information was added to the application.
NFC Card: Share your Digital Business Card in Instants
In addition to the tools available in the ClickCard app, premium users now have the option to purchase the NFC card.
Personalized physical card according to your visual identity. It allows you to share your card in a matter of seconds. Just bring your cell phone card closer to the device of the person you want to share it with.
Although it is a physical product, the NFC Card properties can be edited virtually .
This means that if you want to change the destination link on your card, you don't need to reprint it. Simply edit the link on the ClickCard web platform or in your app.
The digital business card and NFC card are purchased together , and you have full control over your settings.
Free User: basic and efficient customization
Free users get a personalized digital business card with their key information as well as its design.
For the B2C user, the card still has quality and practicality. However, the customization options are more restricted compared to premium users.
Hiring ClickCard: Personalize your Digital Business Card
By contacting ClickCard you can request models to test and choose the template that best meets your expectations .
Based on the visual references sent by the user or company, ClickCard will replicate the visual identity on your digital business card . This includes elements such as color palette, strokes, vector elements, typography, photographs and image editing.
When you request ClickCard's creative team, you have full control over all the details and properties of your card.
Guarantee a personalized and exclusive result now.
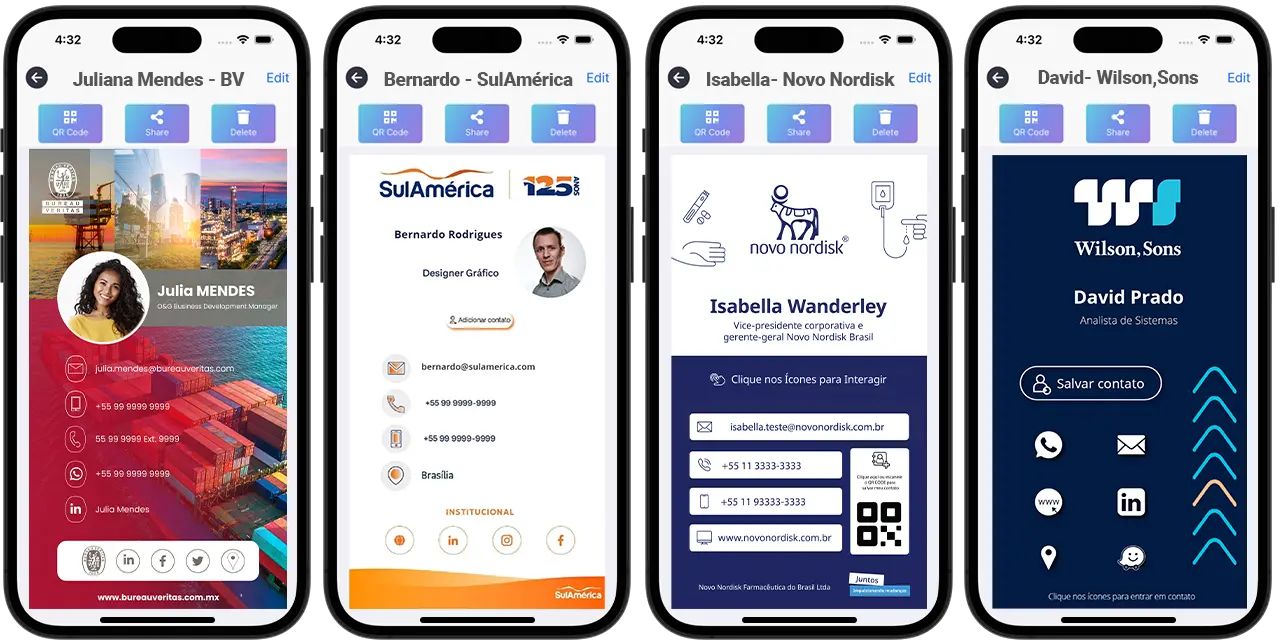
To get a better understanding, check out some digital business card templates created by ClickCard for client companies.
These examples demonstrate how ClickCard strives to study not only the company's design, but also its vision and values.
As a ClickCard customer, you can request the creation of any template and add elements as per your preference.
Download the ClickCard App and enjoy all the benefits
To access all the benefits mentioned above, simply download the ClickCard application or get in touch with our team .
ClickCard is dedicated to solving networking problems, offering ecological, economical and innovative solutions to its customers.
To learn more about our causes, values, vision and mission, visit our website and learn more about us.
We're here to help you create a unique and impactful digital business card.
"Using ClickCard has transformed the way I network. I can share my information effortlessly, and it is always update and with me on the go."

Download our App
Discover how ClickCard can elevate your professional connections and streamline your networking efforts today!

FAQs
Find answers to your questions about ClickCard and digital business cards below.
ClickCard is a digital business card platform that replaces traditional paper cards. It allows users to create customizable digital business cards that can be shared instantly. This innovative solution enhances networking while being environmentally friendly.
Users can create their digital cards using the ClickCard app. These cards can be shared via NFC, QR codes, links or media. This makes networking seamless and efficient.
Yes, ClickCard offers extensive customization options. Users can add their information, backgrounds, social media links, and branding elements. This ensures that your card reflects your personal or company identity.
ClickCard offers sophisticated analytics to monitor and optimize your card interactions. Users can track how often their card is viewed or saved and even see detailed click counts for each button on their digital business card. Managers can analyze both individual and company-wide performance, tracking key metrics such as QR code scans and NFC taps. They can also see which call-to-actions—phone number, email, contact addition, social media, and more—are most engaging, along with the overall number of leads generated. This comprehensive data empowers businesses to fine-tune their networking and marketing strategies.
Absolutely! ClickCard eliminates the need for paper business cards. By going digital, users contribute to a more sustainable future.
Still have questions?
We're here to help you with any inquiries.


